Showing posts with label A Quilted Christmas. Show all posts

Thursday, February 21, 2013

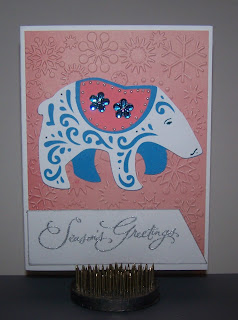
Polar Bear Christmas

Hello my friends. Is it friday yet?

Well I'm in winter wonderland today. Might as well embrace the cold and make another Christmas card.

I'm having alot of fun playing along with all the challenges and I am rather pleased with the way my card turned out. What do you think?


I am entering this in to the following Challenges:
Die cutting Diva's - Polar Bear
Pinspirational - Color Challenge
Paper playtime - use a sentiment stamp
Penny's Paper crafty - Anything goes
Winter Wonderland - Make it a Christmas project
Always playing with paper - Elegant Christmas card
Crafty Hazelnut's - Snow
Crafty Hazelnut's - Anything goes


What I used:
A Quilted Christmas - bear cut at 2.5" using Recollections CS
Basic Grey - True Love 6x6 paper - Salmon CS and embossed using the Cuttlebug Snowflakes folder
Stampin Up! Many Merry Messages Stamp: Season's Greetings
Stamabilities Silver pigment ink for sentiment and tag
Ranger Silver embossing powder for sentiment
Tiny Pearls and flower bling from my stash used on bear rug. :)
Marvy pen in teal for bear details
Card size: 5.5 x 4.25
Mat size: 5.25 x 4
Tag made by me


Thanks for stopping by.
 
Hope you have a beary nice day. hehehe


Saturday, December 1, 2012

My Cricut Craft Room 100 Cart December Blog Hop

Welcome to My Cricut Craft Room 100 Cart December Blog Hop!


If you happended to stop by my blog and would like to start at the beginning of this hop, please click here: http://mycricutcraftroom.blogspot.com/

I'm so glad you're hopping by. For my projects today, I choose the following cartridges: Christmas Village, Wrap it Up, A Quilted Christmas, and Christmas Noel.

For my first project I used Christmas Village and cut my ornament at 4" using MME Dear Santa CS. Since this image has only one layer. I took it to CCR and used the hide contour feature to hide the cut outs from the inside of the ornament so I could use that for my base. I cut this base out on Recollections red CS two times. I used one for the base and one for the ribbon which I cut out by hand.


Since the ribbon on the ornament was too plain for my liking, I colored it a bit with MS Glitter Marker in red. I added a red jewel to the center then added foam tape to the back so I could pop it up from the ornament. Before adding my foam tape I attached the ribbon to the back of the ornament first. I also used the glitter marker to color in the smaller center pieces of the ornament.

I cut the card base from a piece of textured CS. The finished card size is 5 1/5 X 4 1/4. I used the Basic Grey Sizzix powdered sugar embossing folder on my card. I cut the top note from SU out of Authentique CS and inked up the edges with SU old olive ink.

I used a piece of scrap paper for the tag and stamped the Studio g sentiment using Inkadinkado chalk ink in brown and then rounded the two end corners. I used SU chocolate chip ink for the edges and added a small copper brad before adhering it to my card.


My Second project I cut the snowflake box from the Wrap it Up cart on page 68. I used the Cut to Fit feature on my cricut and placed a piece of blue Colorbok CS on my mat and set my cricut to cut.

After I scored my lines and put my box together. I decided to add some patterned CS from MME Dear Santa collection. I cut this at 2 3/4 x 1 7/8 to fit the sides of the box. I used SU Brocade blue ink to ink the edges of the patterned paper before adhering it to my box. This wasn't enough for me so I took my Studio g "Season's greetings" stamp and stamped that around the sides of the box with SU Basic Black ink. Getting better, but it still needs something. Ah HA! The snowflake needs some attention. I took out a MS glitter pen in silver and colored the snowflake then I decided it needed some bling so I added the pearls. I am so pleased with how this turned out. I cannot wait to find that special little gift to put inside it.


For my third project, I used the Christmas Noel cartridge to make another card. The deer was cut at 3". I used a spellbinders lacey oval to show case my deer, then I colored the antlers and hoofs with my Gelly Roll Stardust pen. It's hard to see but I used my Polkadot Daisies Sizzix texture plate on my card, then I lightly rubbed some copper ink over that. The strip behind the oval was a piece of scrap I had left over from another project so I roughed up the edges, inked it and added as another layer. The stamped sentiment "Season's Greetings" is from Studio g.


And Finally for my last project I used A Quilted Christmas to cut my snowman at 3 1/2" again using all scraps from my paper stash. The stamp is from Studio g, I cut around the image to create the tag. I used the herringbone Cuttlebug embossing folder on my card background, seeing a theme here? Yes I love using embossing folders. The Sizzix lacey square was a perfect background around my snowman. The patterened paper is from Authentique 6x6 paper pad from Michaels. The CS used to make my card is from Recollections.
 
Hope my projects gave you some inspiration today. Thanks for stopping by.
 
Your last stop is:  Erica’s Blog Candy
 
 
Here's the entire line up:


Happy Holidays!