Showing posts with label Disney Classics. Show all posts

Wednesday, February 13, 2013

Time for a Non-Traditional Christmas Card

Happy Wednesday everyone. It's almost Valentine's Day but before I celebrate it's time to make another Christmas card to add to my collection.

For my card today I decided to play along with a few challenges and am using the sketch below from Merry Monday Challenge #49 at Always playing with paper.


I normally do not play along when there is a sketch involved but this year I have decided that I need to break out of the comfy zone and try new things.

Here's my take on the sketch. I made a non-traditional Christmas card and I really like how this turned out. What do you think? I know my SIL would love this since her family is all about Disney.


I am entering this into the following Challenges:
Always Playing with Paper - Merry Monday #49 - Use the Sketch
Christmas Card Challenges - Week # 11 - Scallops
Cut it Up - Animation Domination and use a die cut
DL Art - Anything Goes Linky Party
Every Day is an Occasion - Linky Party

What I used:

Dies, Carts and Punches:
Disney Classics Cart: Captain Hook cut at 4"
Spellbinders Wonky Rectangles - the vellum shape behind Hook
EK Success Large Scallop punch - bottom strip

Paper:
EK Success Disney Pixie Dust Vellum
MME Wish 6x6 CS pad
Recollections - Black, gray, white, peach, tan, and dark gray CS
The Paper Company - Cool Metallic Ruby Jewel paper for Captain Hook's shirt
DCWV Metalic CS in Silver for Hook's Hook

Other Supplies:
Felt from Hobby Lobby - for Captain Hook's hat
Recollection black and silver pigment ink
Studio g - Stamp "Ho ho ho"
Brad from my stash
Twine from My Craft Spot
Foam tape - used on Captain Hook and tag

Side Strip of CS measures: 1 3/4 x 3 1/2
Scallop strip along bottom measures: 1 7/8 x 5 5/16
Card size: 4 1/4 x 5 1/2


Thanks for stopping by.


Sunday, May 20, 2012

Disney Pixar Blog Hop - Day Two

Hello my friends I'm so glad you dropped by for Day Two of the Disney Pixar Blog Hop. I absolutley love that Shawn invited me back again as a stop for this Marvelous Magical Hop. We always have so many creative and talented ladies in our fabulous hops and I just love being a part of the fun.


If you came from Jenny's Crazy about Cricut blog then you are in the right place. If you happened to stop by my blog and would like to start at the beginning go to Shawn's Crafty Chic's blog.


I usually have a great project to share at these hops but I've been so busy with our AF walks and event this month that I just did not have the time, so I will be sure to have something wonderful lined up for the next hop.


For my project today, I made a card for my Nephew's birthday in June. Kristal Andrew's has the perfect stamp set called Of Mice and Lil Men. Kristal is the last stop of the hop so be sure to look around Getting Cricky for examples of projects using her wonderful stamps.

I created my card around Kristal's sentiment, "Just a wee wish". I thought it was perfect for a birthday card and who better to deliver that wee message than Jiminy Cricket. I love how this turned out and I can't wait to send it to my Nephew.


What I used:
It's hard to see but I used different textured cardstock from my scrap paper stash. I'm totally into using up my scraps this year.
Disney Classics cart - Jiminy cut at 5"
Mickey and Friends cart - Star cut at 1 1/2"
K Andrews Stamp set - Of Mice and Lil Men
Staples - green
Spellbinders Wonky Rectangles - I love this die
Cuttlebug Argyle embossing folder
Tim Holtz walnut stain distressing ink
Gelly Roll white ink pen and zig black ink pen used for details on card
Foam tape to pop the tag and Jiminy
Sewing machine - orange thread used to sew the frame around the card
Twine from My Craft Spot
EK Success 1/2" circle used to create the ticket tag
Eyelet Outlet - watch brad


Hold on to your ears because I have a Disney Cart to give away to one lucky winner!!!!

Here's what you need to do to enter:

One chance: My friend Stephani just published her book, "Chasing the Light within" to give her our support, I would like you to go visit and LIKE her web page, then let me know you did that.

Two chances: Like me on Facebook if you haven't already, and let me know you did. OR Follow my blog if you don't already.

Three chances: Visit all of the Disney Pixar blogs for both days and leave a comment then let me know you did this.

Don't forget to leave me either a blog address or an email adddress so I know how to contact you if you win. I will announce the winner on Tuesday, May 22 during the evening. The winner will have one week to contact me by email with their mailing address (tamiallore at hotmail dot com).

Sorry only US and Canada residents please due to shipping costs.

Thanks for stopping by and now I'll send you off to the Magically talented Kathy Kathy and 3 Kids blog

Here's the Day TWO line up in case you get lost along the way:
Day Two - May 20th
Shawn http://craftychicsblog.blogspot.com/
Ellen  http://cardmonkey-business.blogspot.com/
Kim http://uscrap2.blogspot.com/
Bobbi Jo http://sweetsassydiva-gspot.blogspot.com/
Jenny http://jennyplace26.blogspot.com/
Jessica http://thecreativestamperspot.blogspot.com/
Jenny http://www.crazyaboutcricut.blogspot.com/
Tami http://www.scrappinrabbitdesigns.blogspot.com/ - YOU ARE HERE!!!
Kathy http://kathyand3kids.blogspot.com/ - YOUR NEXT STOP
Kristal http://www.gettingcricky.com/

Wednesday, May 2, 2012

A Very Happy Un-Birthday to me!!!

Today I am celebrating my Very Happy Un-birthday! Since they say you are only as old as you feel. I'm counting backward...

And to celebrate my Very Happy Un-birthday I am giving away some candy!!!


For 1 chance: Come Like me on Facebook.
For a second chance Follow my Blog.
For a third chance Follow me on Pinterest or Networked Blogs


What's the candy you ask? It's a surprise!!! But I promise the winner will love my Very Happy Un-birthday present!!!!

I will announce the winner on Friday, May 4, 2012 at 7 PM EST. Sorry only US and Canada residents please due to shipping costs.

Tuesday, January 31, 2012

Believe

Wow I actually made a card for a few challenges and I had to use my Disney carts since I absolutley love making anything Disney. I tried to keep it simple so the focus would stay on the characters. The picture did not capture the glitter/pixie dust on Tink and Michael.

What do you think?


Challenges entered for this card:
Getting Cricky: Fantasy Land project
My Craft Spot: Anything goes
Pile it on!: Just Because
Crafty Catz: Things with Wings


Here's How I did it:

Carts: Tinkerbell and Friends and Disney Classics
Tinkerbell cut at 4", Michael cut at 3".

All plain cardstock by Recollections
Pink background cardstock by S.E.I. Chocolate 12x12 paper pack
Michael's p. j.'s by Recollections 8x8 Autumn cardstock
Tink's dress by The Paper Studio -Bella pink small dots

Card cut at 9 1/2 x 8 1/2 then scored at 4 3/4

Sentiment Stamp by Recollections - Fairy Stamp Set
SU Basic Black and Regal Rose Ink and SU Itty Bitty Backgrounds stamp (used for background paper).

Gelly Roll Clear Star pen used for the pixie dust on Tink and the top of Micheal's head.
Martha Stewart Scalloped Lace punch used on edge of background paper.


Thanks for stopping by and happy crafting.

Saturday, November 19, 2011

Disney Pixar Blog Hop - Day Two

Hello my crafty friends. I'm so glad you stopped by for the second day of the Original Disney Pixar Blog Hop hosted by  Shawn of Crafty Chics and Melissa of Disney Dreamers. Thanks ladies for making this hop the best ever.


I'm so excited to be here once again. I just love Disney and I love coming up with Disney projects to share.

My project today is all about fall and those two adorable chipmunks who we know as Chip and Dale. I took my inspiration from Splitcoaststampers and put a fall twist on their tissue box cover.


Here's how I did it:
My base was made from Kraft cardstock (see instuctions on how to make this by clicking on the splitcoaststampers link above).
I used DCWV Autumn Afternoon cardstock for the 4 panels.
I cut 2 each of Chip and Dale at 4" from the Disney cart using Recollections cardstock and pieced them together then placed them on my background paper.

From that same cart I cut several leaves and acorns from cardstock that I had in my stash. The leaves were cut out at 1" and 3/4" and the acorns were cut at 3/4".

I inked my leaves using SU close to cocoa ink and curled them slightly to give them a more realistic look then attached them one by one using pop dots.
I attached my ribbon to the top of the box using double-sided tape then attached the leaves and acorns using pop dots again. A Zip pen was used for the details on leaves and chipmunks. Hope this project inspires you to make your own tissue box cover.

AND NOW...

We have a GRAND PRIZE for this Blog Hop donated by ContainYa Crafts! You can have YOUR CHOICE of a Scrap'n Tote or a Scrap'n Easel! Each blog in this two day hop has a special letter, and when all of the letters are put together they spell out a secret phrase.
My letter is S
Once you have stopped at each blog in the hop and collected all of the letters, simply email the phrase they create to bloghopcontests at gmail dot com. All entries must be in by Midnight on Monday, November 21st. The winner will be announced on Tuesday, November 22nd at http://craftychicsblog.blogspot.com/

Don't go away just yet! I have some blog candy up for grabs.

In order to be eligble to win my candy you must:
1. Visit every blog in the Disney Hop and leave them a comment.
2. Leave me a comment on this post with your email and/or blog address by 12 mid night EST on November 20th.

I will announce the winner during the evening of Monday, November 21st.

That's it so now I send you off to Kathy 

Here's the line up for Day two in case you get lost along the way.
Shawn
Melissa
Megan
Kim
Bobbi Jo
Jenny
Jessica
Jenny
Susan
Tami - HERE
Kathy -Go HERE NEXT

Monday, September 26, 2011

DISNEY PIXAR LINK-UP PROJECT: Scrapbook Page

If you are looking for my Disney Blog Hop Link Click Here

Hello fellow mouse-kateers. I will be at a conference for work most of this week and will not be able to respond and visit anyone until Thursday evening. I have set up my project for the Disney Link up Party to post automatically so here's my first project.

I made this layout with Bambi in mind. I thought Bambi was the perfect fit for my Granddaughter's sweet smile, what do you think?


Details:
Stampin UP! Patterned card stock cut to 6x6; solid cs in really rust and dusty durango
Creating Keepsakes card stock from the All in One 8x8 Scrapbooking Kit
Rest of card stock from my scraps

Disney Classics Cartridge:
Bambi cut at 3”

Plain Chipboard flowers
Glossy Accents used over the patterned paper on the chipboard flowers
Making Memories Clear creations Transparent overlay – You are my sunshine
EK Success small butterfly punch and 1¼ x 2” oval punch
Brad from my stash
Gelly Roll Stardust pen

Thanks for stopping by. I always love to read your warm and fuzzy comments. Keep crafting.

Sunday, September 25, 2011

Disney Pixar Blog Hop Day Two

Welcome to the Third Original Disney Pixar Blog Hop! This is the second day of our fun filled hop.


You should have arrived here from Susan's Blog. If you just happened to come across my blog and would like to start at the beginning please go to Shawn's blog by clicking here.

I want to take a moment to thank Shawn and co-host Melissa for giving me the opportunity to participate in this wonderful hop again.

My project today is all about Disney Classics.

I took my inspiration from a class by Awesome Albums from the Creating Keepsakes Convention of 2009. I decided that this was the perfect thing to make in order to showcase Alice in Wonderland.

The pictures don't show all the glitter on the characters and the shiny papers that I used. But I sure had fun creating it and hope you enjoy this as much as I do.
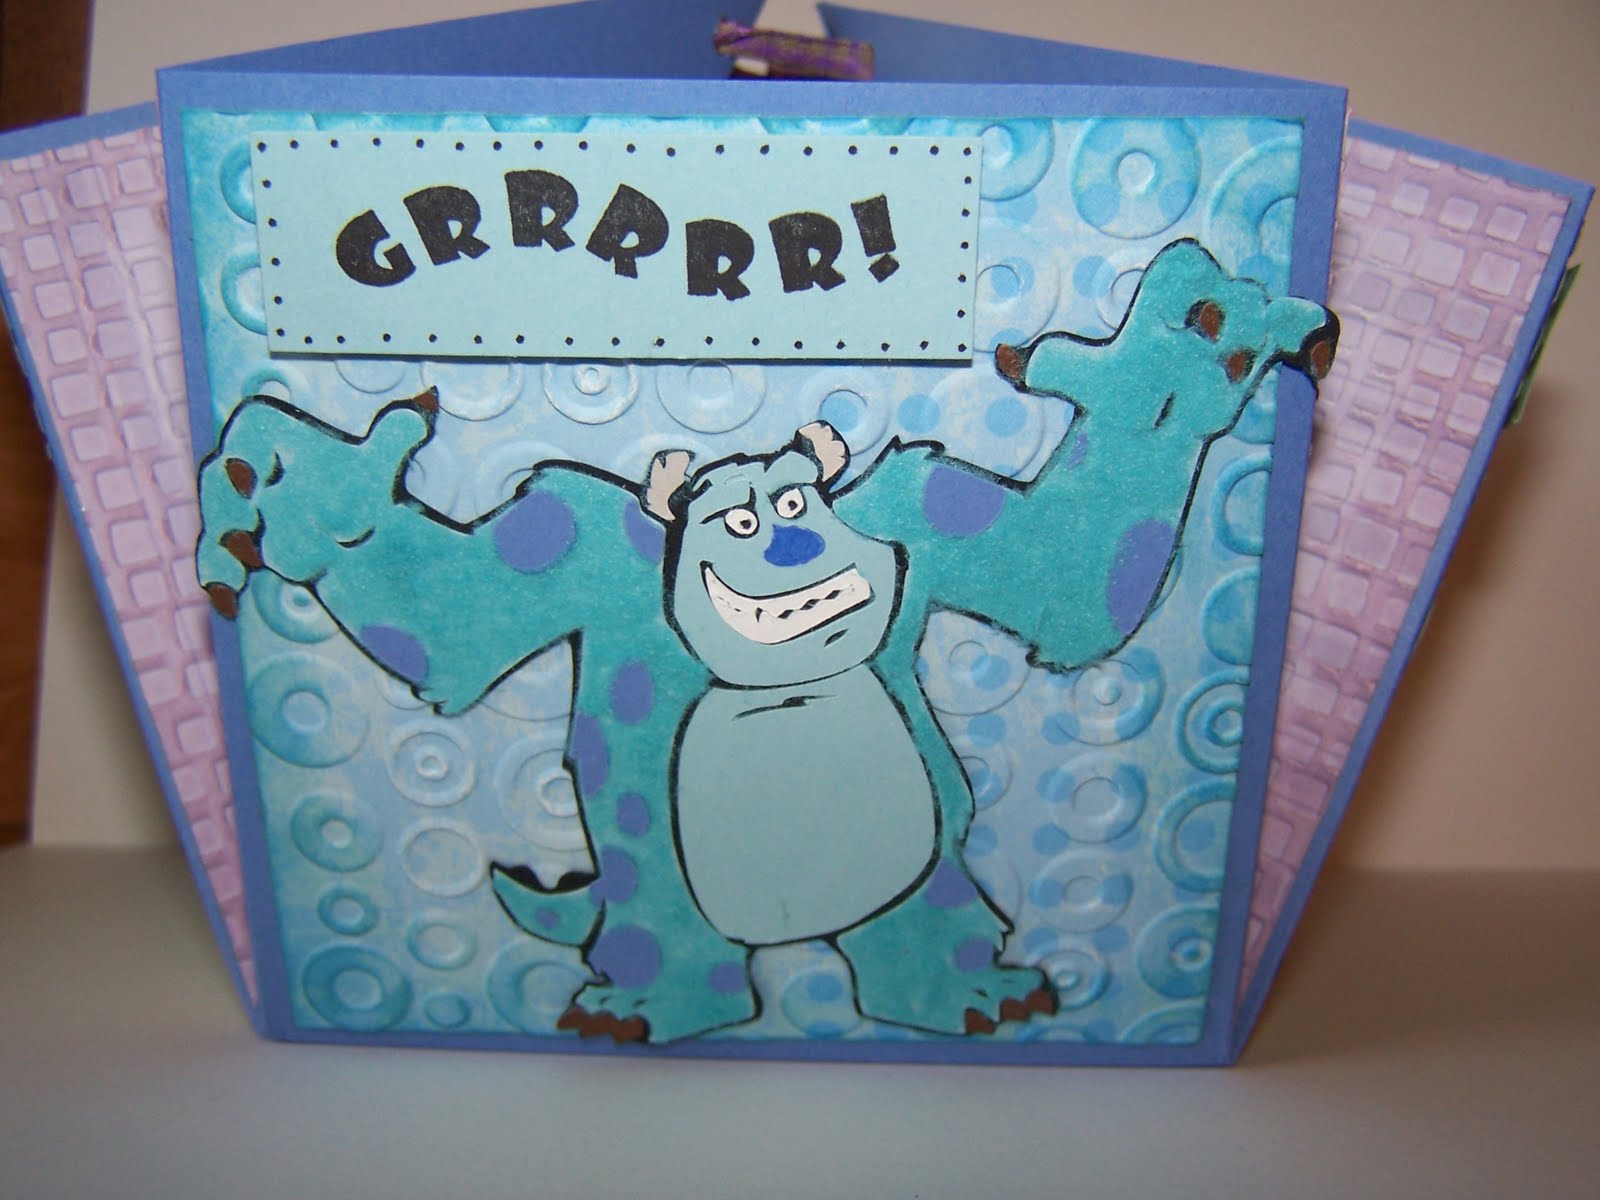
Front cover:

Here's a closer look at the title.
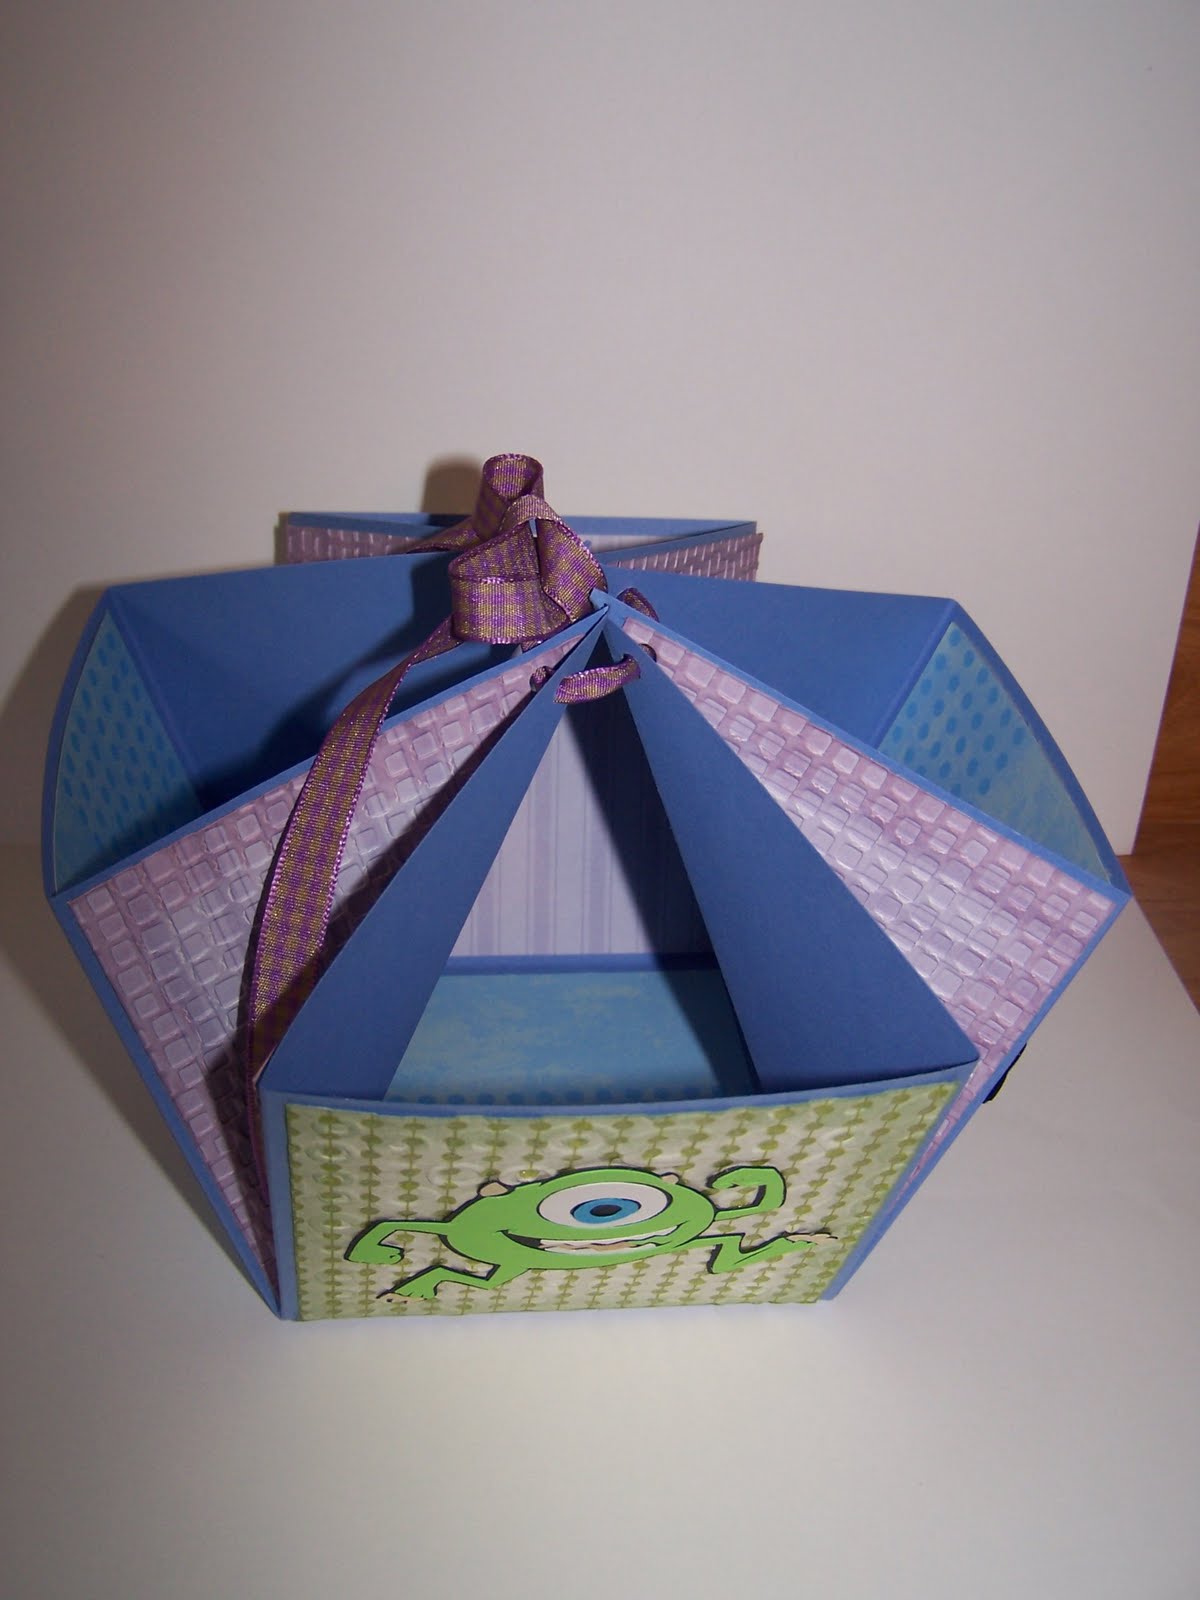

Inside the folio.


Here are the close up pictures of the tags. It's so hard to tell but I used a pearlescent paper on the watch, vest, and umbrella.

Back of tags.


Instructions for the Tagged Folio by Awesome Albums
Things that I changed on this folio:
I used Velcro as my closure instead of two brads and a string.
I changed the sizes of my patterned paper to decorate the outside of the folio.
I chose to decorate my tags; the teacher chose to leave them plain for the class.


Cut printed papers to size.
Print A: 5.5”X12” and 5.5”X6.5”
Print B: 6X8”
Glue the 6X8 piece to the Chipboard

Cut card stock to size.
Color A: 2 sheets cut into 6 pieces 5x7”
Color B: 3 sheets, cut to 6x6”, 6X9”, 6X5.5”, 6 pieces 4X12

Fold and score the 4X12 card stock at 3”, and 8.5”. Fold and glue the overlap. Stack folded pieces and glue only in the center in a vertical line.

Fold and score the 6x6 card stock at 4.5 and 5.5”
Fold and score the 6X9 card stock at 8”
Fold and score the 6X5.5” card stock at 4.5”
Glue first piece to the board creating upper flap
Glue second piece to the board leaving bottom 1”
Glue third piece to the bottom 1”
Cover those with print A using the smaller piece on the lower portion
Insert folio section into lower portion gluing only in the center of the front and back as you did when building the stack.

Attach brads to front and tie upper brad with string creating closure.
Decorate front as desired
Staple or glue ribbon tabs to 5x7” cards and insert into pockets.

What I used to make this tagged folio:
Paper:
Solid card stock from Recollections
Patterned card stock from:
1. Crate paper portrait collection /something blue pack
a. Punch outs from this pack: flowers, brackets, clock, keys, tags, etc.
2. The Paper Studio – turquoise gothic stripe – single sheet from Hobby Lobby
3. 6x6 My Minds Eye Lost & Found designer card stock from Hobby Lobby
4. Me & My Big Ideas – Black & white butterfly 12x12 card stock pack
5. Colorbok pearlescent white card stock – used on teeth for Cheshire Cat
6. DCWV Metallic Stack – Silver card stock

Disney Classics Cricut Cartridge:
1. Alice in wonderland cut at 4 ¾“
2. Alice cut at 4 ½”
a. Bottle cut at 1 ½”
3. Cheshire Cat cut at 4 ½”
a. Sign with post cut at 1 ¾“
b. Other signs cut at 1 ¼ “
4. Rabbit with Watch cut at 4 ½”
a. Teapot cut at 2”
5. Rabbit with Tea cup cut at 4 ½”
6. Queen of Hearts cut at 4 ¾“
a. Heart and Diamonds cut at 2”
7. Mad Hatter cut at 4 ½”
a. Teacup cut at 2”

Stamps:
Foot Longs by Hampton Art Warm Fuzzies Clear Stamp Set: Mushroom
7 Gypies Steampunk Clear Stamp Set: hands and ruler
Fiskars Latte Love Clear Stamp Set: Spoon and teabag
Martha Stewart Clear Label Stamps: Square note
Kelly Panacci Time Flies Clear Stamps: scroll work on rabbit with teacup and rabbit with watch

Punches:
EK Success 1 ¼ X2” oval punch
Stampin Up! Small oval punch

Glue:
Foam Tape
Glue Dots
Zig 2-way glue pen
Herma Fill dotto permanent glue

Other Supplies:
Piece of Medium weight chipboard
Round Velcro closure
Ribbon and buttons from my stash
Basic Black Ink by Stampin Up!
Cuttlebug D’Vine Swirls Embossing Folder
The Paper Studio wood grain Embossing Folder
Yellow and Red Stickles
Zig Black pen for details on characters and icons
Gelly Roll Stardust glitter pen for shimmer on characters and icons
Drywall tape: used to pick up small pieces off of Cricut cutting mat

CANDY ALERT!!!
Thank you so much for playing along in our hop. Before you go I have some Disney themed candy to give away.


To enter for a chance to win my blog candy:
1.) Become a follower, if you are not one already.
2.) Leave me a comment with your blog address or email if you don't have a blog. Comments must be submitted by Tuesday, September 27th by 11:59 PM EST to enter.
3.) Tell me how you would use this folio if you made it.

I will announce the winner of my blog candy on Wednesday, September 28th in the evening. The winner will have 1 week to respond.

Now it's time to hop over to
Amy of Love To Crop


DON’T FORGET THE LINK UP PARTY on Monday, September 26th.

To LINK YOUR PROJECTS go to the following blogs.
Shawn - Link your scrapbook pages
Melissa - Link your cards
Amy - Link any other Disney projects (cakes, decor, anything that is not a card or scrapbook layout)

Here is the full list of the DAY TWO direct links line up:

http://craftychicsblog.blogspot.com/2011/09/disney-pixar-blog-hop-day-two.html
http://disneydreamerdesigns.blogspot.com/2011/09/3rd-edition-of-original-disneypixar_25.html
http://uscrap2.blogspot.com/2011/09/day-2-disney-pixar-blog-hop.html
http://sweetsassydiva-gspot.blogspot.com/2011/09/disney-pixar-blog-hop.html
http://jennyplace26.blogspot.com/2011/09/disney-pixar-blog-hop-day-2.html
http://thecreativestamperspot.blogspot.com/2011/09/disneypixar-blog-hop-day-2.html
http://www.creativecutter.org/2011/09/disney-blog-hop-iii-day-two.html
http://jamielanedesigns.blogspot.com/2011/09/welcome-to-disneypixar-blog-hop.html
http://yesterdaystomorrow2011.blogspot.com/2011/09/disneypixar-blog-hop-and-giveaway-3rd.html
http://www.cricutforbeginners.com/?p=1953
http://scrappinrabbitdesigns.blogspot.com/2011/09/disney-pixar-blog-hop-day-two.html
http://www.lovetocrop.com/2011/09/disneypixar-blog-hop-day-two-ears-to.html

Sunday, May 1, 2011

Disney Pixar Blog Hop

Welcome to the second Disney Pixar Blog Hop!


You should have arrived here from Susan's Blog. If you just happened to come across my blog and would like to start at the beginning please go to Shawn's blog by clicking here so you don't miss her project and the awesome blog candy she's giving away! You can also enter to win the Grand Prize of the Gypsy by finding the two blogs that have a Hidden Mickey (see details at the end of my post).

I am so excited to be participating in my very first blog hop! A BIG thank you goes out to Shawn and co-host Melissa for giving me the opportunity to participate in this wonderful hop. For the second time we come together to celebrate our love of all things Disney, which includes the Pixar family of characters.

My projects today showcase both Disney Classics and the Best of Pixar.
So first up is the Disney Classics. I really wanted to make the Cheshire cat from this cart so I decided to put him on a card.

I wanted to use the classic Disney colors so I made him red and black. Hope you like it.


Recipe:
Cheshire cat cut at 4" with the paper company cardstock
Patterened paper from DCWV Summer Dream Stack
Cuttlebug folder - Divine Swirls
Stamp from My Pink Stamper More Punny-licous
Ribbon from Michaels

Next up is The Best of Pixar cartridge.
For those of you who are already followers of my blog you get to see another version of my basket using the Best of Pixar theme.

I made the Basket first then I choose to decorate it with the Monsters, Inc. characters. I'm very pleased with how this turned out so I have several pictures to show you all the sides.


Recipe:
To make this a little challenging for myself I decided to flock Sulley after cutting him out at 3 ¼”.
Mike and Boo are cut at 3 ¼” too. I added some silver scales to Boo’s outfit using a Martha Stewart glitter marker since the piece of paper were just too darn small to work with.
Roz was cut out at 3 ½” then I added sparkles to her chain on her glasses and her blue hair.

The Paper Company Cardstock was used for characters and base of basket.
Patterned Cardstock used:
Nana’s Nursery – Baby Boy
DCWV – The Fun in the Sun Summer Glitter Stack
My Mind’s Eye – Deena’s Penny Lane Glitter Cardstock

Cuttle Bug Folders:
Spots and Dots
Tiny Mosaic Texture

Glitter Gel Roll Pen
Tim Holtz Distressing Ink – Broken China, Bundled Sage, and Milled Lavender.
Foam tape
Inkadinkado – black chalk ink
Recollections – My Little Monsters clear stamp set

CANDY ALERT!
Before you go, I want to thank you for coming to the blog hop by offering you a chance to win some candy.


I'm giving away the same stamp set and one of the cuttlebug folders that I used to create the Monsters, Inc. basket along with some other goodies. Also the lucky winner will get the Monsters, Inc. basket too!

To enter for a chance to win my blog candy:
1.) Become a follower, if you are not one already.
2.) Leave me a comment with your blog address or email if you don't have a blog. Comments must be submitted by Sunday, May 1st by 11:59 PM EST to enter.

That's it and now I send you off to a very talented lady
Kristal of Getting Cricky.

Don't forget you can also enter to win the Grand Prize of the Gypsy by finding the two blogs that have a Hidden Mickey.

RULES FOR GRAND PRIZE GIVE-A-WAY: Make sure to stop by all of the blogs on both days of the hop for your chance to win a Gypsy, donated by ContainYa Crafts, Maker of Scrap'n Tote & Scrap'n Easel. There will be two blogs, one on each day of the hop, who will have a special "Hidden Mickey" in their post. I am so happy that my blog was selected to be the Hidden Mickey Blog for today. If you are looking for the hidden mickey from yesterday you might want to check HERE.


To enter to win the Gypsy, simply send an email to cricutsearch@gmail.com and tell us which two blogs you found the Hidden Mickey on. All entries must be in by midnight on May 1st, and the winner will be announced May 3rd at the following blogs www.ScrapnToteBlog.com, http://craftychicsblog.blogspot.com/ and http://www.disneydreamerdesigns.blogspot.com/


Here's the line up for today in case you get lost along the way.

Shawn http://www.craftychicsblog.blogspot.com/
Diane http://www.capadiadesign.com/
Susan http://www.cricutforbeginners.com/
Tami http://www.scrappinrabbitdesigns.blogspot.com/ YOU ARE HERE
Kristal http://www.gettingcricky.com/ NEXT STOP
Jessica http://www.thecreativestamperspot.blogspot.com/
Kaye http://www.yesterdaystomorrow2011.blogspot.com/
Cathie http://www.creativecutter.org/
Bobbi Jo http://www.sweetsassydiva-gspot.blogspot.com/
Jamie http://www.jamielanedesigns.blogspot.com/
Kim http://www.uscrap2.blogspot.com/
Melissa http://www.disneydreamerdesigns.blogspot.com/

The winner of my blog candy will be announced on Friday May 6th using random.org so please check back if you want to know who won!

Monday, April 4, 2011

April Showers!

Well its back to work full time for me so I will only be bloggin' during the evenings if I can fit it in but don't leave me yet! I have the weekends to play.

This card is for the FCCB Challenge 54 April Showers challenge and the CREATIVE SISTERS MONDAY CHALLENGE #5 - BUNNIES I sraplifted myself in a way. For those of you who saw the Winne the Pooh card a while back I took my saying and background from that and changed it up a bit. What do you think? I love it because I love this Rabbit.


Here's my Recipe:
I cut the Rabbit at 4" from the Disney Classics cart. Let me tell you the piece are very small to work with at this dimension.

I used the April Shower cart to cut the surprised cloud at 1 ½”.

I used Create a Critter, Yay my new cart, to cut the sun at 1 3/4"

The card is from DCWV Summer Dream stack.

The paper that I used for the back of the cloud, Sun and Rabbit came from The Paper and Company.

The top of the cloud was cut from came from American Traditional Designs textured cardstock.

The sentiment, face on the cloud and rain drops are from the 2008 Holly Brooke Jones for My Cute Stamps set.

The ink is Not Quite Navy from Stampin Up!

Foam tape used on cloud and sun to pop them just a little.

Orange Peel Stickles used on outer part of sun.

Whew! Okay I have to go hubby is calling me to go sit out on the deck with him and enjoy what sun we have left before the rain comes in this evening.

I'll be back this weekend...

Thursday, March 31, 2011

Bitten By The Bug 2 Challenge and Blog Hop

My entry for the Bitten by the Bug 2 Disney challenge is the catipillar from Alice in Wonderland. When I saw him on this cart I couldn't wait to create a card with him in mind.


Here's How:
The background paper is from My Minds Eye Penny Lane stack. The catapillar was cut at 6" from the Disney Classic cart using cardstock from the Paper Company. The mushroom was cut at 4" from the Fresly Picked cart. I cut the mushroom on chipboard first then I cut it again on cardstock. I put the mushroom together then ran it through my big shot using the Spots and Dots cuddlebug folder. The glitter paper on the mushroom is from DCWV Glitter matstack. I cut the grass from the Plantin Schoolbook Cart at 2" then ran it through my Big shot using the Swiss Dots cuddlebug folder. I used Marvy markers to outline and add a little color to the swiss dots on the grass and leaf.