Showing posts with label Create a Critter. Show all posts

Friday, August 23, 2013

Cut It Up Challenge #26 - Back to School Altered Notebook

Well summer flew by didn't it! Here we are with another Cut It Up Challenge to bring in the new school year. Challenge #26 - Back to school - altered notebook.

This was a fun challenge and also a little sad for me since this is my last post as a design team member for Cut It Up! I had a blast and it has been wonderful to be a part of such a great team.

I chose to alter three mini notebooks. My daughter gives out little incentive prizes for different stages of learning so I decided to add to her prize bucket with these. She wanted me to stick to the subjects as my theme so this is what I came up with.


Carts used:
Create A Critter
Going Places
Life's a Party

Glitter stick on letters from my stash
Stamp set used for the books under the worm
Ribbon from my stash
All paper from my scrap bin


Stop by the Cut It Up blog to see more awesome notebooks
from my DT sisters and to join in on the fun.
 
Can't wait to see what you come up with. :)

Monday, July 22, 2013

Craftin Desert Diva's Linky Party - Child's Birthday - Animal Theme

I am so excited to be a guest designer for Craft It Up & Link It Up Linky Party hosted by Tara of Craftin Desert Divas! Every other Monday marks the beginning of a new semi-weekly linky party and you could win fabulous prizes by playing along!!

This linky party theme is a Child's Birthday using an animal. The sponsors are:

KaDoodle Bug Designs - $15 giftcard 
Robin's Nest - $10 giftcard
CardzTV- Stamp set of choice

The more you link up, the better your chances to win one of the awesome prizes listed above.  Visit Craftin Desert Divas for all the rules and to play along.


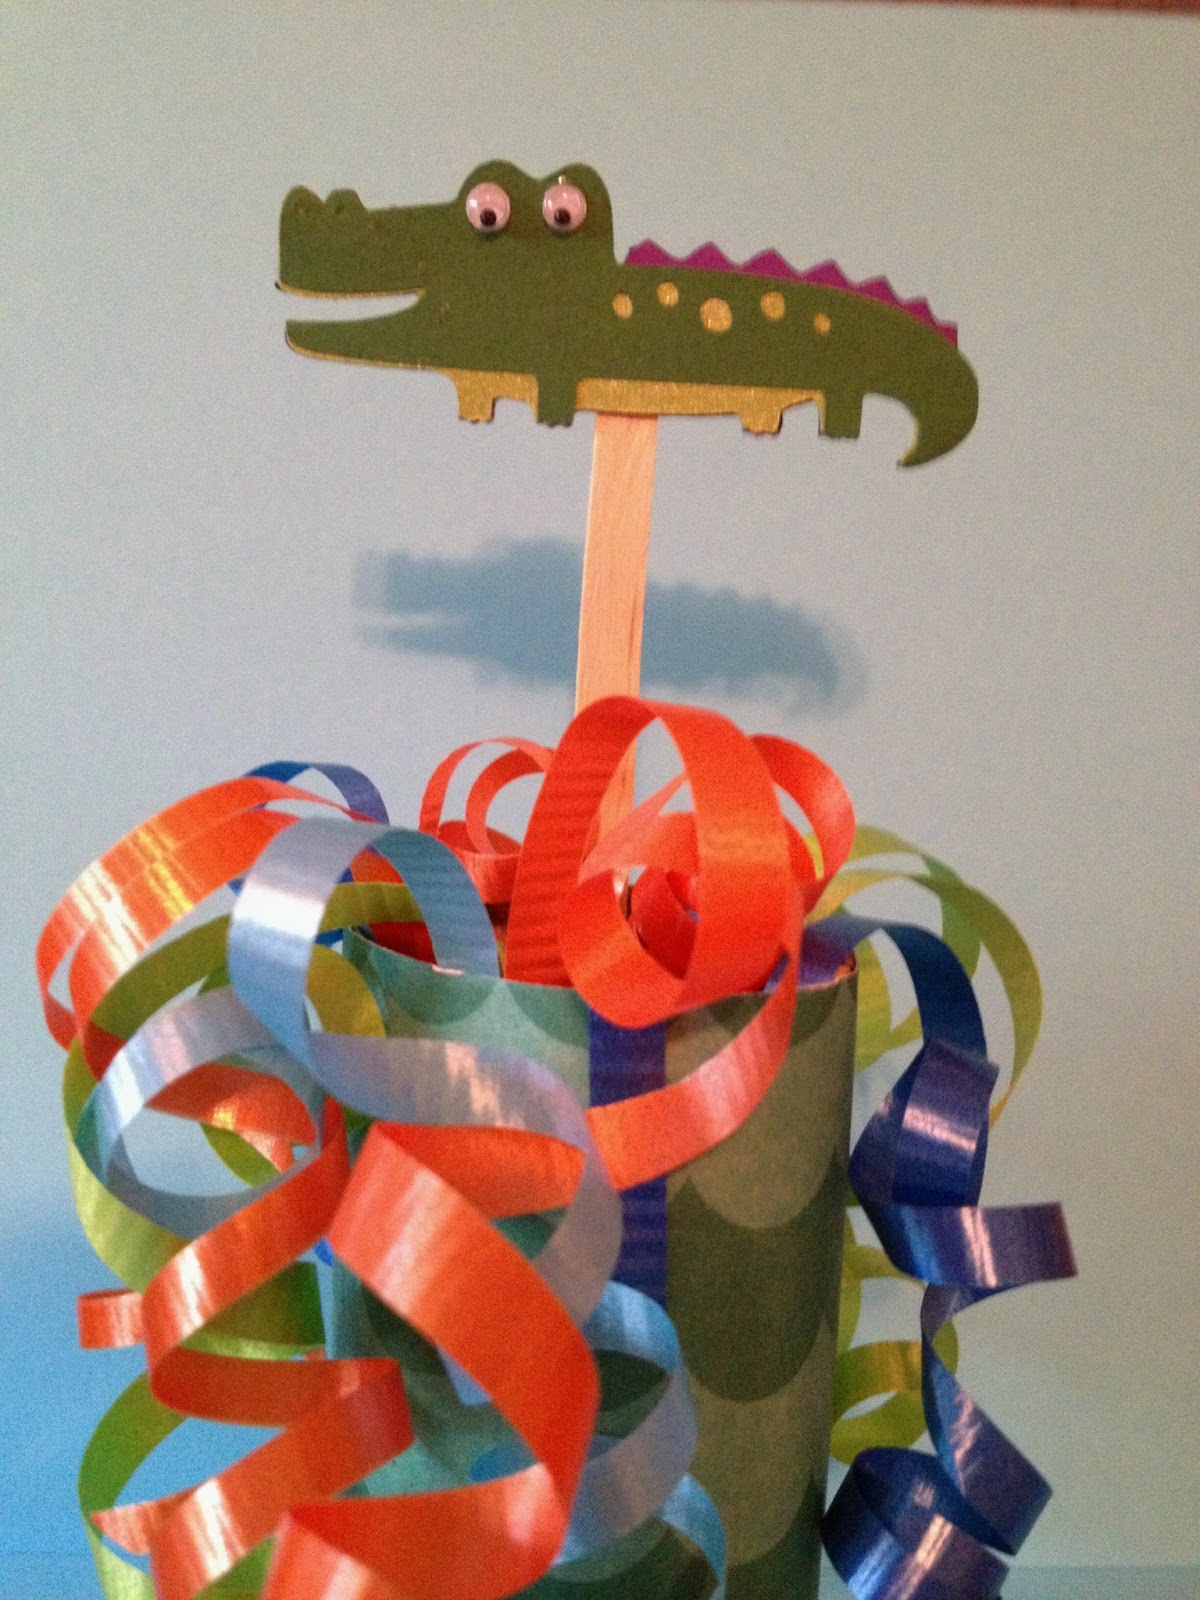
For my project today, I made a party favor. Cute and simple. This idea came from the paper creations magazine summer issue. I loved this idea and had to try it out for myself. It's super easy to make so you could make several of these in no time.


Here's what I used:
Create A Critter cart - pg. 45 Gator cut @ 1" assembled and glued to coffee stir stick
Paper towel roll cut down to 4"
Spellbinder Standard circles die to use as end cap for the party favor. trace around your tube then make tick marks with your scissors up to your traced circle. Bend this petals up and glue to your tube for your end cap.
Jaded blossoms - small treat bag
Curly ribbon and card stock to decorate roll - colors of your choice. Cut CS to fit roll and attach. Cut curly ribbon long enough to tie around treat bag and flow out top of roll. Make sure you fill the tube with your favorite candy, toys, etc. then curl ends of ribbon and place treat bag inside of open end of roll.
Swedish Fish candy - I thought it would cute and it goes with my gator theme. :)

Thanks for stopping by. 

Can't wait to see your projects.


Thursday, March 21, 2013

Cut it Up Challenge #15 - Lion or Lamb

Hello my friends. Glad you stopped by for another Cut it Blop Challenge.

Cut it up Challenge #15 - March goes in like a Lion and come out like a Lamb. Create a project using a lion or a lamb.

I choose the lamb, well two lambs are better than one right? Hehehe


It's hard to tell but I used the Swiss dots Cuttlebug folder for both the black and white lambs fur. The Lambs were cut @ 3" from the Create A Critter cart. I used foam tape to pop them off the card and snuggled them together to make them look like the were holding hands.

I used Tim Holtz tattered flower die for the flowers and the CS is from S.E.I Bassett pack. The background mat is cut at 5.25 x 4 and the card is 5.5x 4.25.

The sentiment is from My Pink Stamper More Punny-licious stamp set. I cut my own tag and used SU basic blk ink. The brads are from my stash.

That's it sweet and simple.

Hop on by the Cut It Up Blog to more inspiring projects today from the Cut it Up DT and to play along. Can't wait to see your creations.


Thanks for stopping by.


Friday, November 9, 2012

You're my favorite Turkey

Hello and Happy Friday Friends! I had just enough time to whip up a quick card this afternoon before my Aunt and Uncle arrive for the weekend.

I need a few Thanksgiving cards for my family so I created this one for my daughter.

What do you think?


Here's how I created this card:
I used all my scraps to make all my elements on the card. The Turkey was cut at 4" from Create A Critter. I added a few dots to give him some life. I put foam tape on him to pop him up just a bit. The scalloped die is from Sizzix, I just folded the scalloped edges up for a feathery look. I used a Studio g leaf stamp and SU close to cocoa ink to stamp my image on the background of the card. I used this same leaf to stamp the inside of the card too. The "Your my favorite Turkey" stamp is from My Creative Time mixed holiday sentiments stamp set. The tag is from Jaded Blosoms Flag dies, just cut it in half and inked it up.

Hope you have a great weekend and thanks for stopping by.

Saturday, February 18, 2012

Holy Cow I created another card!

Hello all my crafty friends. I hope you are enjoying your weekend so far. I've been playing in my craft room today along with doing laundry. Oh yay the laundry... oh well. :)

I made a birthday card for two challenges today and I am so pleased with how this turned out. I've seen this cow with this stamp before but couldn't resist making my own version.

I absolutely love my SU Top Note Die and so I tend to use it often. This is one of my favorite things for the Crafty Catz challenge. My other favorite thing is to use sentiment stamps. I adore them and I love giving cheesy cards to friends and family. I know you can't resist smiling when you get a card with a punny sentiment even if there is an eye roll added along with it. :)


Challenges:
Crafty Catz - Favorite Things
Frosted Designs - Brads or eyelets

What I used:
Create a Critter Cart: Cow cut at 3" from Recollections cardstock

Stamps:
Pink by Design: Party till the cows come home from Take the cake stamp set
The Paper Studio: Curly design around edge of card from Cupcakes stamp set
Happy Birthday used on the inside of card came from Walmart back in 1996. Wow is that old or what!

Queen & Co black pearls used for the cow eyes
Sizzix SU Top Note Die used on Making Memories Water Color Collection Ice Blue cardstock
SU Basic Black ink
Zig Pen and White gelly pen used for detailing on the cow and Top Note Die
Black Brad from my stash
Background carstock from S.E.I. Morocco 12x12 paper pad
Foam tape used on Cow and tag

Friday, July 22, 2011

Let it Snow!

Happy Scrappy Friday!

Hope you are enjoying your day today. I have been happily playing in my craft room this afternoon and came across the Jolly Holiday cart challenge by Bitten by the Bug2. Their challenge is to use the penguin on page 59 of this cart.

I thought to myself how fun is that since I have a lot of Christmas cards to make. Here's what I came up with. Hope you like it as much as I do.


Here's a close up of the snowflakes that I made:


Inside of the Card:


How I did it:

Card base cut down to 4 1/4 x 5 1/2 and scored in the center using paper from My Mind's Eye Signature Christmas Holiday Glitter book.

I stamped this paper with a mini snowflake stamp that I purchased many, many moons ago at Ben Franklin craft shop. I used SU bordering blue ink.

I cut the penguin out at 3" from COLORBOK pearlescent paper. I cut the umbrella using paper from My Mind's Eye Wonderful Winter glitter holiday paper stack.

I used google eyes with lashes that I bought from Hobby Lobby.

For the snow that the penguin is standing on I used DCWV glitter matstack paper and punched it with my EK Success large scalloped punch. Then I inked the top with Technique Tuesday Cornflower ink.

To create the snowflakes I used the Martha Stewart snowflake punch once on the white glitter matstack and several times with a smaller snowflake punch from EK Success. I used my Tombow multi-liquid glue to attach the blue snowflakes to the white ones then I blinged it up using Queen & Co rhinestones in the center. I attached these to my card using glue dots.

My stamped sentiment came from Hampton Arts mini flip flops clear Snow Fun stamp set and the SU bordering blue ink. I punched out the oval tag using the EK Success 1 1/4 x 2" punch from a left over scrap. Then inked around the edge.

Hope you enjoy the rest of your Friday.

Tuesday, April 5, 2011

I can't resist the challenges!

This card is for the following challenges.

Birthday Sundaes Challenge-3 anything goes birthday
Cute as Bug Challenge

I couldn't resist making this card after visiting some blogs and seeing all the great projects that every one has made.


Recipe:
I used the Create a Critter cart to cut the bee hive at 2 1/2" and I cut the bee at 1 3/4". I couldn't resist adding a little waterfall stickles to the bee's wings to make them sparkly. American Traditions textured cardstock was used on the bee and bee hive.

The patterned paper is from Cosmo Cricket Material Girl & Garden Valley Double Pack. I love this paper pack!

The card is from SU Soft Suede cardstock.

The stamp is from the Paper Studio Company "Cupcakes".

Thanks for stopping by.

Monday, April 4, 2011

April Showers!

Well its back to work full time for me so I will only be bloggin' during the evenings if I can fit it in but don't leave me yet! I have the weekends to play.

This card is for the FCCB Challenge 54 April Showers challenge and the CREATIVE SISTERS MONDAY CHALLENGE #5 - BUNNIES I sraplifted myself in a way. For those of you who saw the Winne the Pooh card a while back I took my saying and background from that and changed it up a bit. What do you think? I love it because I love this Rabbit.


Here's my Recipe:
I cut the Rabbit at 4" from the Disney Classics cart. Let me tell you the piece are very small to work with at this dimension.

I used the April Shower cart to cut the surprised cloud at 1 ½”.

I used Create a Critter, Yay my new cart, to cut the sun at 1 3/4"

The card is from DCWV Summer Dream stack.

The paper that I used for the back of the cloud, Sun and Rabbit came from The Paper and Company.

The top of the cloud was cut from came from American Traditional Designs textured cardstock.

The sentiment, face on the cloud and rain drops are from the 2008 Holly Brooke Jones for My Cute Stamps set.

The ink is Not Quite Navy from Stampin Up!

Foam tape used on cloud and sun to pop them just a little.

Orange Peel Stickles used on outer part of sun.

Whew! Okay I have to go hubby is calling me to go sit out on the deck with him and enjoy what sun we have left before the rain comes in this evening.

I'll be back this weekend...