Showing posts with label Happily Ever After. Show all posts

Wednesday, December 12, 2012

December 12 - MCCR Bippity Boppity Boo Blog Hop

Welcome to the My Cricut Craft Room Bippity Boppity Boo Blog Hop.


When I saw the name of this hop, I knew I wanted to join in on the fun. My sister is getting married on December 21st and I needed to make a wedding card for her and her husband to be. So I pulled out my Happily Ever After cart and went straight to Cinderella and Prince Charming on page 39.

I cut the happy couple out at 5" and still found that Cinderella's lips were so small I had to use my pick to place them exactly were I needed them. :)

I wanted Cinderella's dress to sparkle and Prince Charming's suit to shine so I cut the gown from the DCWV glitter stack in white. Well, no bride is complete without a few pearls so I added a few to her head piece, vail, and dress. Since Cinderella's face and chest piece were separate this left a line in her neck that I didn't care for, so to hide that I gave her a pearl necklace too.

Prince Charming's suit was cut from pearlescent card stock in black to give it a sheen. For his tassel and belt I used my gelly roll stardust glitten pen to add some royal bling.


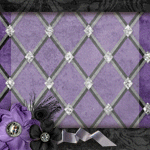
I started with a 5x7 card that I got in a pack from Hobby Lobby then I added the layers for my background using patterned paper from atd (Momenta) Story of us CS pad. The first layer was cut at 4 3/4 x 5 3/4" rounding the corners with my corner punch. To soften this layer I used some silver ink around the edges. The next layer was cut using my Sizzix beaded oval and softened with silver ink, then I added some silver pearls to help frame Cinderella and Prince Charming.


To finish off my groom, I used my black glaze pen to add shine to his shoe. My stamped sentiment, "True love stories never have endings" is from Jaded Blossom's Wedding Wishes stamp set. Here's a close up of the sentiment.


Hope you enjoyed my project today.

To see more Bippity Boppity Boo projects today please visit: http://mycricutcraftroom.blogspot.com.

Thanks for hopping by and Happy Holidays!

Tuesday, November 27, 2012

November 27 My Cricut Craft Room Card Creating Tuesday

Welcome to my Cricut Craft Room's Card Creating Tuesday.


Hello my bloggie friends, for my Design Team post on My Cricut Craft Room we were asked to create a Star Card.

I really need to get going with my Christmas cards this year so I created another Christmas card to add to my collection. It is not a star shaped card but a card with a star on it, well two stars, if you count Doopey. :)

I cut Doopey at 4" from the Happily Ever After cart using all my left over paper scraps. Trying to be frugile and use up all my extra scraps this year. However, I did use Authentique 6x6 cardstock for the polka-dot outfit on Doopey.


For my card I used Recollection cardstock cut at 10 x 7 then I folded that to create my 5x7 card. I used the Sizzix texture plate for the background to give my card a little more dimension. The next layer was cut using the SU Top Note die and another piece of Authentique CS. My tree was cut at 5" using the Joys of the Season cart. I had to add some liquid applique to create a little snow on my tree and to puff it up I used my heat tool. The red berries on the tree are from my bling stash. I also added just a bit of sparkle with my gelly roll stardust pen.


To cut the star that Doopey is holding I used the Mickey and Friends cart and cut that at 1 1/4" using some pearlescent paper. I used a little SU old olive ink around the edges of the star and a few doodles with the zig pen, cause that's just my style. I used a little bit of chalk ink on Doopey's face to give him that warm glow. The Tag was cut from the Jaded Blossoms Flag dies then cut in half, inked and doodled up. The Deck the Halls stamp is from Studio g.


Thanks for stopping by. Happy Scrappin.

To see more projects like this today please go to http://mycricutcraftroom.blogspot.com

Wednesday, September 21, 2011

Happy Fall

Happy Wednesday evening my friends.

Hope your week is going well so far. It seems to be going by pretty fast for me. And have you noticed the time change? It's starting to get darker a little earlier here in the South. That's the part of fall and winter I wish we didn't have to have. But I do love the cooler weather and snuggling up by the fire and all the pretty leaves. So with Fall in mind I decided to play along with My Craft Spot Challenge this week. Their challenge is all about Fall leaves. I am also entering this card in the Cooking with Cricut Challenge #52 - The Colors of Autumn.

Since I seem to feel sleepier in late fall I picked one of my favorite characters to help me with this fun challenge.

Now who doesn't love Sleepy? I thought he was perfect for my fall leaves challenge. What do you think?


This card took a little bit of work but it was well worth the results.

I cut Sleepy at 4" from the Happily Ever After cartridge. Then I used my Doodle Charms cart to cut a leaf at 1" and 3/4" out of different colors of solid and pattern card stock from my scraps.

I used Tim Holtz Distress ink in frayed burlap and inked all of the edges of all of my leaves. I think I cut around 20 of the 1" and around 40 of the 3/4". Whew! That was a lot of inking! I added a line in the center of the leaves with my zig pen then I curled the edges of all the leaves.

And finally I placed foam tape behind sleepy and positioned him on my card base. Then I started placing my leaves one by one around sleepy using pop dots.

Sleepy was cut using recollections solid card stock and his P. J.'s are also from Recollection card stock called Autumn which was in an 8x8 pad.

I used the sentiment - Happy Fall from the Mixed Holiday stamp set from My Creative Time and I also used the fancy frame stamp and die set to create the tag.

The ribbon was from my stash which I believe I bought from the dollar bin at Hobby Lobby a while back. I put foam tape behind my tag too.

Tada! My card is finished and I love how it turned out.

BLOG HOP ALERT!!!!
I won't be posting another project until this weekend for our Disney Pixar Blog hop. You won't want to miss this so mark your calendars for THIS SATURDAY AND SUNDAY. We are going to have some amazing projects to share and some great candy.

Hope to see you hopping on Saturday and Sunday. Until then keep on crafting.

Tuesday, March 29, 2011

Here comes the Easter Bunny

This is my entry for the Fantabulous Cricut Challenge #53 Looks Like Spring.

I also linked this to the Patches of Pink Link up Party.

I made this Easter card for my nephews since they are big Disney fans. I am so pleased with how this turned out.

I used a 5” Grumpy from the Happily Ever After cart and remove his pick axe. I had to have something for him to lean on so I chose a 4” Easter basket from the Stretch your Imagination cart. The Easter basket came with a little bunny so naturally I had to include two. Since Grumpy is grumpy I had to give him a reason for his grumpiness so I put him in a pink shirt and highlighted his cheeks to help him express his annoyance. I cut grass at 1 1/12” from the Plantin SchoolBook cart and blinged it up with a little lime green stickles. The solid paper is from the paper company. The patterned paper is from the My Minds Eye Simply Delightful stack which I used for the background and Easter basket. The sentiment stamp and eggs are from Studio g mini stamp sets. I used Marvy markers to color the eggs and then I used a blender pen from SU and a Marvy marker to give grumpy his pinkish hue on his face. The sweet petites Tiny Check brown ribbon is from AC Moore.

Tuesday, July 22, 2008

Baby Card


I made this card for my friend when I found it she was going to have her baby the first Friday in August. Unfortunately I do not know whether it is a boy or girl, so when I found that out I will place the last word on the front of the card. It's a boy or girl.


Saturday, July 19, 2008

Gell Well Card

This is my favorite card. I just made this for a friend.


Here is my stamp that I put on the back of the cards that I design.